Case studies are very useful to demonstrate the impact of your work, to raise awareness about how change is happening at the grassroots, and to support organisational objectives such as raising funds and lobbying governments. People connect much more strongly to a personal story when they can put a face to it, so it’s highly recommended to get a good, high-quality photo and/or video of your interviewee. Here are some tips and suggestions for how to take the best photo, including headshots and action shots, or video possible.
Taking photos
- Hold the camera in the landscape position, held straight, and not from above or below
- Make sure your subject is well-lit from the front, preferably in natural light
- Ensure the background is nice/not cluttered
- Get the person/people in frame. Don’t cut off their faces/heads
- In group “actions” shots use one person as a central focus in an image. Avoid taking photos of people’s backs
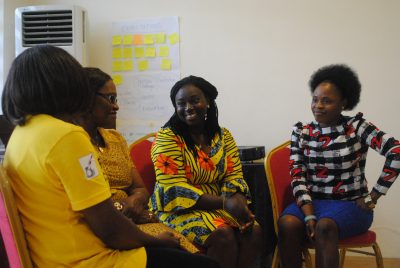
Good headshot photo ✅
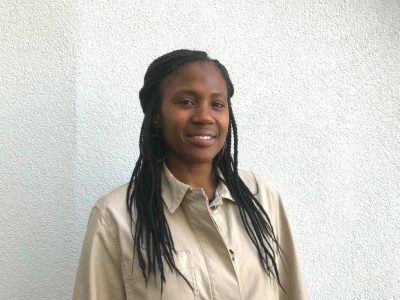
- Camera is landscape
- Face is central in the frame
- Plenty of space above her face
- Shoulders in the shot
- She is lit from the front
- Taken in natural light
- Happy and relaxed
Bad headshot photo ❌
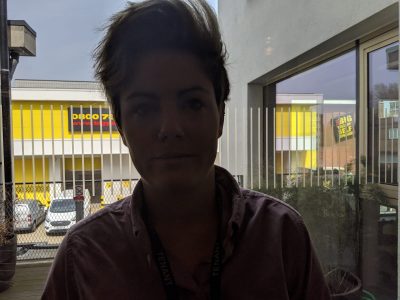
- Busy, unattractive background
- Lit from behind, face in silhouette
- Top of her head is cut off
- Taken too close to the subject
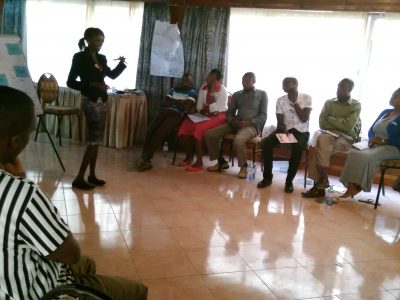
Good action photo✅
- We can see their faces and one person is a focal point in the frame
- Well lit with natural light
- They look happy, relaxed and collaborative
- All the group are within the frame
Bad action photo❌
- The main focal point is the back of someone’s head
- It’s dark and people are lit from behind
- You can’t see people’s faces or what is happening
- It’s blurry
Taking videos
- Take 30-60 seconds footage of an interviewee speaking directly to-camera about their experiences
- The video should ideally be in one take
- Find a bright, quiet area to film, where you’re unlikely to be interrupted. Natural light is preferable
- Hold the camera straight in landscape position, and frame the person centrally in the shot
- Do a test video and listen back to ensure the speaker can be heard
- The person filming and asking questions should not be heard on the video. The speaker should answer in full sentences i.e. “I’ve had an amazing experience during this programme,” rather than, “It’s been amazing”.
- The speaker should speak clearly and not rush
- As the interviewer, avoid making “mm hmm” noises as the speaker talks
Good video ✅
- Framed centrally within the shot
- Nice, uncluttered background
- Well lit with natural light
- The audio can be heard, and no one interrupts
Bad video ❌
- Not well framed in the shot
- Dark and shadowy, lit from behind
- Busy unattractive background
This “How To” guide is in support of Orchid Project’s ‘Guidelines for writing a good case study’.
You can also download it as a pdf resource, here.
We welcome your feedback on both these documents as to whether they are helpful, and how else Orchid Project can support you to gather case studies.
If you have any feedback, please reach out to our Communications Team by emailing miranda@orchidproject.org or to our Programmes Team by emailing lola@orchidproject.org.